
Gas Grill Cleaning Tips to keep you Safe
Tips to Clean Your Grill
A thorough cleaning – a relatively easy and quick chore – after each use will be more healthful, and will make grilling easier by eliminating the built-up grease and the dreadful flare-ups.
Who knew your grill needs to be cleaned and maintained. More often than not, the response we get is "I did not know I needed to clean my grill."
In most homes, your stove or cooktop is spotless because we know that spills can get baked on and become not just a complete, unsightly mess, but a royal pain in the you-know-what to scour clean. Best to wipe down and clean the burner and surrounding area as soon as it is cool enough to do so.
But if you visit that same home’s back yard, the gas grill will often feature caked-on grease and cooking residue not only on the grate, but on the burners, briquettes, and on the sides of the unit and under the hood.
Why? Because most grillers either do not perform any maintenance or simply do a simple brush down of the grate right after cooking, close the lid and call it good.
It’s not good. A thorough cleaning – a relatively easy and quick chore – after each and every use will not only be more healthful, it will also make grilling safer and easier by eliminating the built-up grease that can cause flare-ups and uneven cooking, and it will extend the life of the gas grill and keep it in fine working order and with a great appearance for years to come.
Also, before grilling session, a periodic inspection of the grill manifold (the pipe behind the control panel that the valves are attached), housings and burners will keep the gas flowing smoothly and safely.
See the below picture of a manifold that has rotted. This grill is unsafe and cannot be used in its current state. The manifold must be replaced. These clients had no idea this was behind their control panel. They called us to fix their grill because it was not working properly.
The gas that was shooting out of the manifold could have resulted in a dangerous fire!

Periodic cleaning or replacing the lava rocks or stone will ensure that the unit heats and cooks up to its specifications.
Note that many manufacturers will deny warranty parts claims if the the part failed from abuse, misuse or neglect.
Stay Safe with these Gas Grill Cleaning Tips
These Grill Cleaning Tips every outdoor chef should follow to maintain the status of Master Griller.
Be sure to read your Owner’s Manual.
First and foremost, all grills are not created equal. They aren’t cheap, and maintaining them properly is extremely important. With each and every gas grill – there are hundreds of brands – they are different, with unique types of burners, heat disbursement systems, cooking grates and valves, etc.
In this regard, the first best source for cleaning advice – whether performing a quick cleaning after each use or annual cleaning at the beginning of each new grilling season – is the unit’s owner’s manual which comes with every grill. These care and use manuals include great cleaning tips and advice, customized for that particular grill’s system and parts. They will break down how to disassemble and re-assemble the grill parts for a thorough cleaning job.
After each use (or if you have used alot of sauces or fatty meats):
Depending on how often you use the grill and what you cook, every now and then remove the cooking grate and clean off the heat plates (or briquette trays) above the burners. Sometimes this is a steel or metal plate that gets caked with grease, but it could also be the lava rock or the stone briquettes, which can be cleaned with soap and water and a stiff brush. (Lava rocks or briquettes sometime just get inundated with grease and should be replaced; no big deal). Allowing grease to cake on these items will cause flare-ups and uneven grilling.
• Brush off your grates. Depending on the material of your cooking grates you will want to clean and maintain them differently. Read about the
different types of grates.
We love using Scotch-Brite’s Stainless Scrubbers. These are great to use after each use to wipe down the grates and remove excess food. They work great on all types of grids from stainless steel to porcelain coated. We find many people have a tendency to do this before grilling, and not after, but after grilling is the way to go.
Let the grates cool completely and brush the grate and remove all the residual food and grease. We suggest not using any type of water or degreaser unless the cooking grates are removed.
How to clean cast iron grill grates?
Use a brush or stainless scrubber. After cleaning them, you may want to take a cloth or a paper towel and rub cooking oil into them. This will help keep these types of grates from drying and rusting out. Also, inspect it from time to time to make sure there is no rust or chunks coming off.
- You can turn the grill on high before each use and burn some of the left over grease off. But realize, over time, this will make your parts take a greater beating. This extra hot setting will burn up things that have fallen into the grill, but you still need to clean as described above.
Take out your Heat Plates and use the stainless scrubber to remove excess grease.
Drip or Grease Trays are an important part to clean. The longer grease continues to sit on the trays, it will cause the tray to burn through. There are almost NO aftermarket part grease trays, so if this part fails, you may want to keep good maintenance on these.
Annual cleaning of gas grills:
Annual maintenance. We suggest a minimum of Twice a year – or every quarter if you are a grill fanatic, use lots of sauces or live in a year-round warm climate – you should perform complete maintenance.
Items Suggested : Stainless Scrubber, Grill Degreaser, Stainless Cleaner (if your exterior is Stainless Steel), Venturi Brush, Shop Vac, Razor Blade or Putty Knife, Grill Paint (if you have an aluminum grill head) and a small drill bit.
Optional : A good tool to invest in is a hand held wire wheel. This tool restores stainless cooking grates to an almost new condition
Your annual grill maintenance and cleaning involves completely taking the working (guts) parts out of the grill and cleaning them. Begin by removing the cooking grates, burners and heat disbursement system and set aside on a old towel.
Clean the outside of the grill with an all purpose household cleanser or degreaser which will clean and keep the grill looking great for years to come. If you have a stainless grill, use a stainless steel cleaner to keep your hood nice and shiny.
Once again, check the owner’s manual as some units – particularly stainless steel units – will have particular tips and suggestions as to cleaning methods and cleansers.
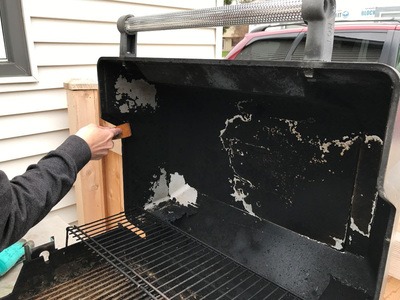
Inside the hood you may think it's peeling. Do not worry it is not. It is caked on soot. Best way to tackle this is by spray a good degreaser, such as Zep. Let it sit a few minutes and take a razor blade or a putty knife.

With the guts removed from the grill, Grab a shop vac and vacuum all the debris that has fallen in the bottom of the firebox. This is important because that debris heats up when you grill and can cause your firebox to burn through.
1. Spray a grill degreaser on your cooking grates and let it sit. Then use the stainless scrubber to clean them off. Be sure to completely rinse all of the degreaser off the grates. If you have stainless steel cooking grates, you may want to consider purchasing a hand held wire wheel. These are amazing at restoring stainless grates to an almost new condition.
2. Inspect your heat plates or briquette trays be sure they are not crumbled. If they are in tact then use a grill brush or a stainless scrubber to remove excess debris. Cleaning these will help with flare-up and uneven cooking. Flare-ups occur where there is excess grease. So it is important to maintain these parts. If they are not in tact, you will want to replace them as they will not spread the flame evenly across the grills surface. Many people ask why do my heat plates disintegrate so fast? These parts take the brunt of the beating. The have sauces and fats dripping on them while taking the flame directly below them. Every time you let grease and fat sit on them fuel the fire the flame from the burner, you put and enormous amount of stress on these parts.
3. Your Burners are essential for cooking your food. They are the heartbeat of the grill!
Without your burners, your grill is useless.
How to clean gas grill burner tubes?
Remove from the grill and inspect the burners and make sure there is no rust through, nothing blocking the gas flow, be sure the port holes are completely clear and clean thoroughly or replace. Use a brush or stainless scrubber to clean the burner, then take a venturi brush and clear any spider webs that may be in the tube. Shake out the burner to get out any debris on the inside. Use a small drill bit and clear out each of the port holes.
If any of them are clogged, you are forcing more gas out of the remaining holes. This will compromise the metal and eventually cause a blow out.
Do not use water or degreaser on your burners. Use a stainless scrubber to clean the burners and a small drill bit to clear any debris blocking the port holes. If your burners structure has been compromised (like the picture below), you should consider replacing. Having burners in good working order ensures even cooking.
If your Gas Grill Burner has a hole (like pictured below) needs to be replaced

4. Check the orifices, valves and manifold and make sure that they are free from grease buildup. Spray WD-40 around the valve stems. This will help keep them from seizing.
In conclusion, getting to the surfaces at least once a year will keep your grill operating safely for years to come. Wipe down the sides, and underneath the top or dome, with a soft cloth and degreaser. A little elbow grease, ironically, will help remove the grease down to the shiny surface the unit came with. Make sure to completely dry what you just cleaned.
Gas Grill Cleaning Note: Some folks take the cooking grates and wrap them with aluminum foil, shiny side out, and then turning the unit on high for 15 to 20 minutes. While this may create intense heat that reduces residue to ash for easy removal. Don’t do it. No manufacturer of gas grills recommends this method, as the extra heat can warp the grates. (See Below Image)

We hope this has been helpful to maintaining your grill. You are always welcome to ask us a question or drop a note.
The BBQ Depot is the top source anywhere for anything grill – so check out the site for thousands of choices of gas grills, outdoor kitchens, replacement parts, and accessories.
To help with gas grill cleaning, visit our Grill Parts page for a complete selection of replacement parts to keep that grill running smoothly, and our Accessories page for such things as replacement lava rock and briquettes.
