
Grill Tube Burner Installation
Tube Burner Installation Instructions
** Turn Off Gas Supply. No Smoking or Open Flame. **
Removal of Old Burner
1. Remove old burner. There may be screws, pins or other fastening devices that is holding the burner in place. Note your disassembly as your reassembly is the opposite procedure.
Note : Now is the perfect time to clean debris, accumulated grease and food in the grills interior
Installation of New Burner
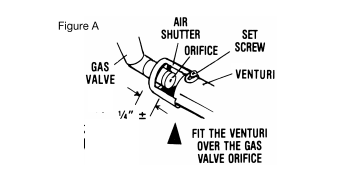
2. Install New Burner. Refasten as originally installed. The new burner should go over the valve orifice (See Figure A)
Testing the Burner
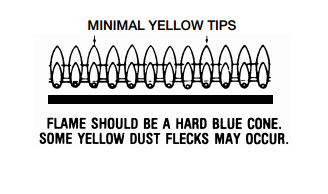
3. Test Burner. Turn on the gas and light the replaces burner noting the flame pattern. Wait several seconds. The flame should be even and mostly blue, it is normal to see some yellowness. (See Figure B)
*** CAUTION PARTS MAY BE HOT ***
Adjustment After Installation
If adjustment is necessary, be sure the burner has cooled. Loosen the air shutter screw and rotate the air shutter slowly in either direction until the correct flame is attained. Retighten the screw.
