
The Complete Guide to Getting Your Grill Ready for Summer
Nothing beats pulling out your grill after it's been sitting under the cover all winter long! Before planning family gatherings or barbecues, it's crucial you take the time to clean your grill inside and out. In this guide, we're giving you step by step instructions on how to get your grill ready for summer. You'll learn how to clean your grill and grill parts, when to replace your grill parts and where to find grill replacement parts and how to season your grill.
As long-time grill fans and experts, we know the best ways to prepare new and old grills for grilling season. These steps will ensure that you get the absolute best performance and flavor from your grill for as long as possible.
Cleaning A Grill
Before you inspect your grill, you need to clean it first. Cleaning your grill not only improves the taste of your food, but it also extends the life of your grill.
After sitting all winter long, there may be rust or debris from bad weather or other factors. A bird or small animal might have made a home in your grill while it was not in use. Regular cleaning stops residues from building up, preventing flare-ups and unsafe cooking conditions.
We recommend to start by checking your owner's manual. It has helpful tips on cleaning methods for your grill and the right products to use. For example, stainless steel units are most likely to have particular cleaning needs, which we will cover.
To start, make sure to have some important grill cleaning tools:
- Stainless scrubber
- Grill degreaser, or stainless-steel cleaner
- A shop vac
- A razor blade or putty knife are also helpful
- A handheld wire wheel
- A brush
Now you’re ready to deep clean your grill!
How To Clean Inside Of A Grill
- Safety is the top priority! Make sure to turn off the gas supply before you start cleaning.
- Remove all the parts from the inside of the grill.
- With the guts removed from the grill, thoroughly clean the underside of the lid.
- Use a razor or putty knife to scrape off built up debris and grease from the firebox.
- Vacuum all the debris that has fallen in the bottom of the firebox. This is important because the debris heats when you grill and you don’t want it to burn right through your firebox.
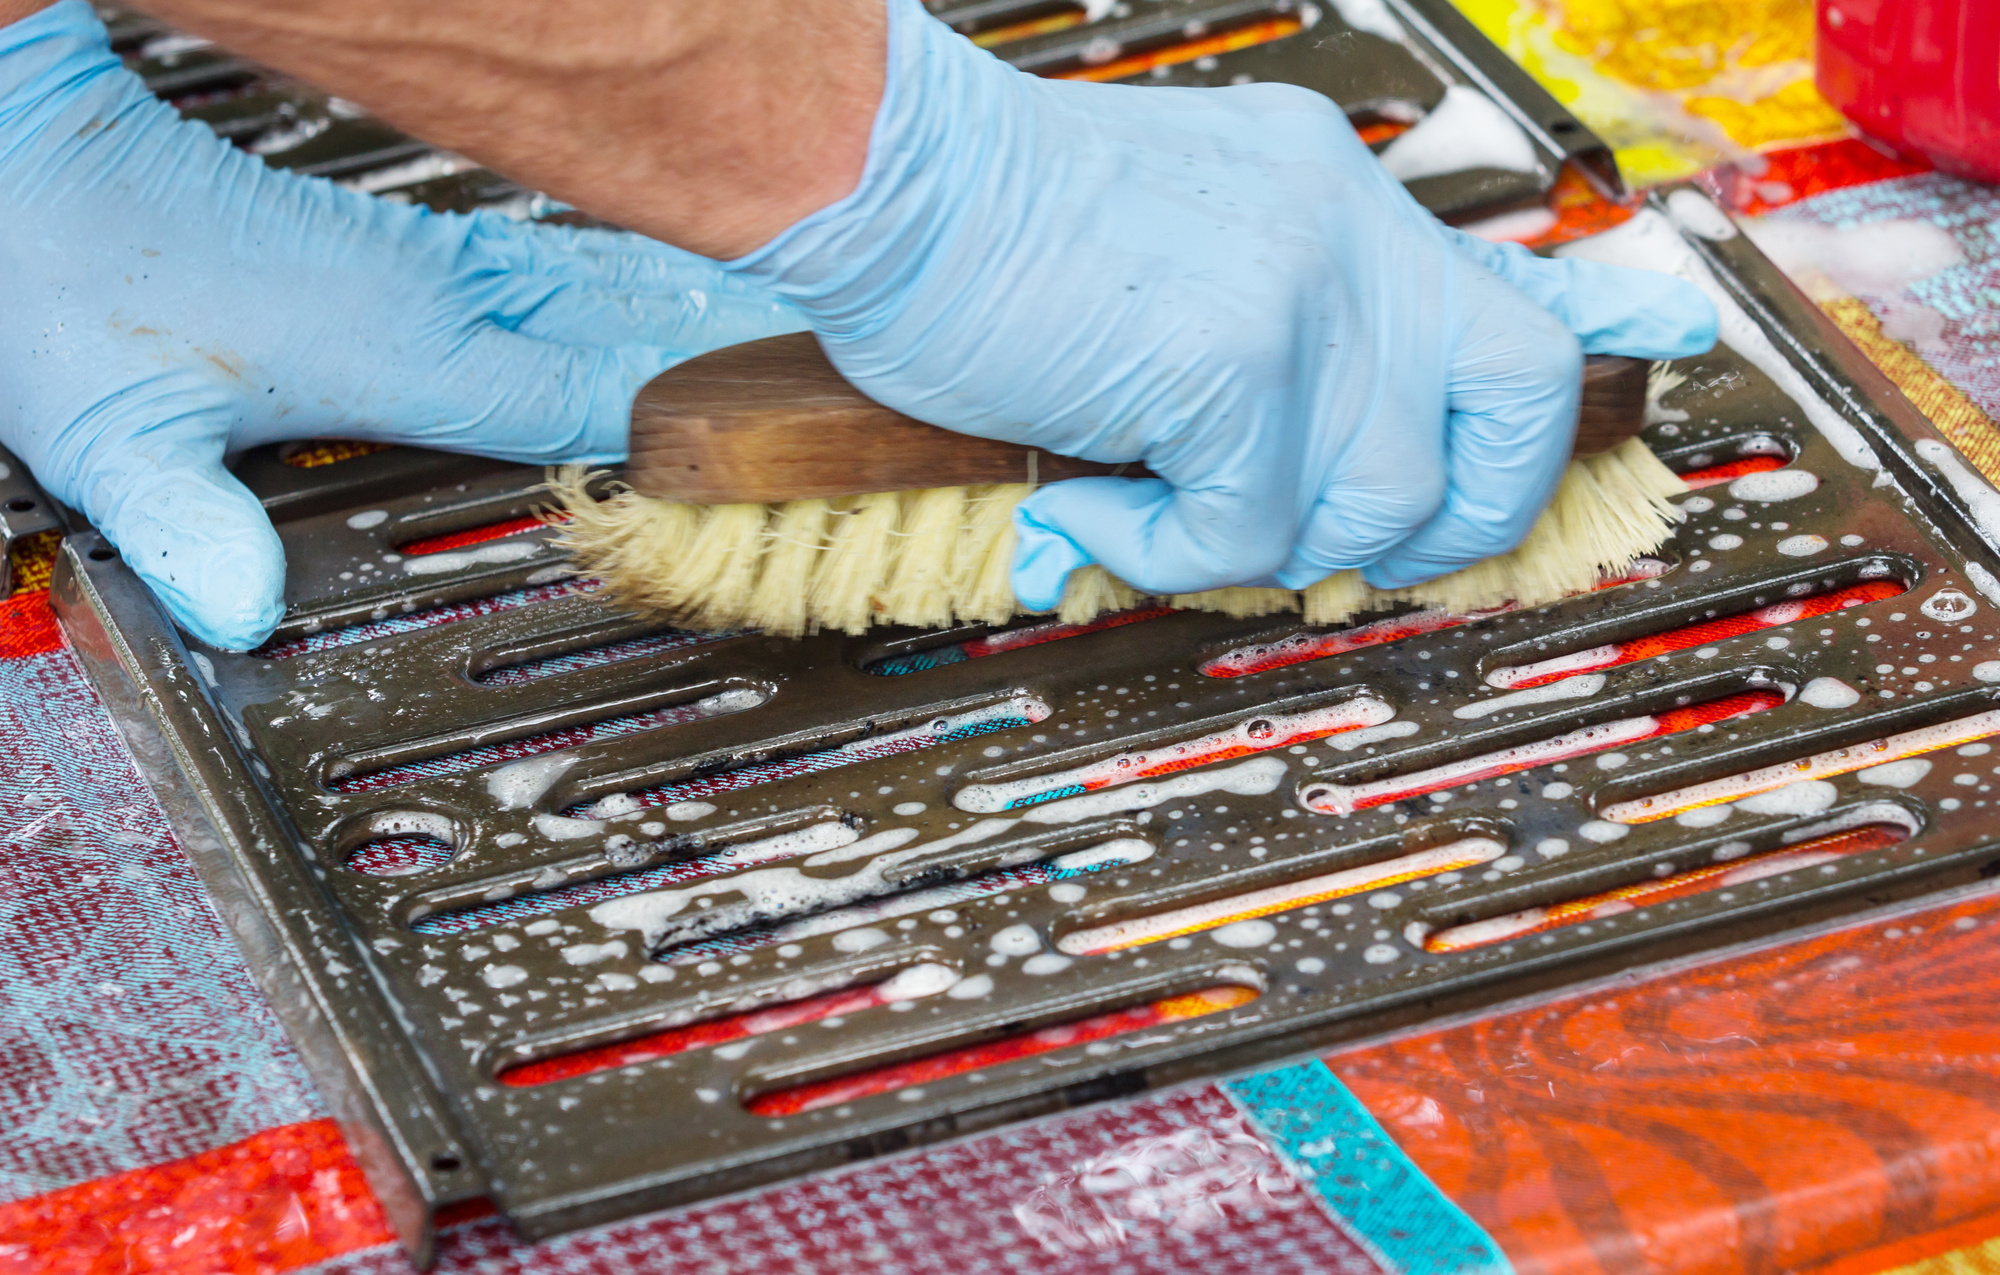
Cleaning Grill Grates
Over time, your cooking grates accumulate grease and food particles. These residues harbor bacteria and affect the taste and quality of your grilled food, so it's essential to keep them clean. Clean grill grates also ensures better heat distribution and prevents sticking, which can ruin the texture of your dishes.
Here's the best way to clean stainless steel grates:
- Spray your cooking grates with a grill degreaser or stainless cleaner and let it sit to make your job easier.
- Then use the stainless scrubber to get them nice and clean.
- Make sure to thoroughly rinse all the degreasers and cleaners off the grates. You do not want to taste any of residue when you start grilling.
- If you have cast iron grill grates, check out our guide for cleaning tips on cleaning cast iron grill grates.
- Dry your grill grates completely, especially if they're cast iron. Any water that remains on the grill grates will cause it to rust and degrade quicker than you’d think.
*Important Note: If your cooking grates have built up grease and residue, we suggest making a paste with equal parts baking soda and water. Brush it onto the grates and let it sit for about 10 minutes before rinsing and drying.
How To Clean Grill Burners
The burners are the engine of your gas grill. Cleaning your grill burners ensures even cooking and prevents flare-ups. Over time, grease and food particles clog the burner ports, leading to uneven heat distribution and potential safety hazards. Regular maintenance of your grill burners is essential for the optimal performance of your grill.
- Consult your grill's manual for instructions on removing the burners. Each grill model may have specific instructions, so it's important to follow the manufacturer's guidelines.
- Use your stainless scrubber to remove any debris from the outside.
- Clean your grill burners and their housings by taking a drill bit or paper clip to thoroughly clean the holes that surround the burner.
- If you have cast iron grill burners, clean them first. Then, rub a high heat resistant oil on the cast iron. This will help prevent rust and drying out.
Cleaning the Outside of the Grill
A clean exterior is not only about aesthetics. By removing built up dirt, grease and rust it helps to maintain your grill's longevity.
- With your grill parts removed from the grill, scrub down the outside with warm, soapy water.
- Take a hose or wet cloth and rinse the soap off, making sure you do not get the inside of the grill wet.
- Dry completely using a microfiber cloth. If you have stainless steel elements components, make sure you go with the grain of the steel.
**Important Note: Make sure to dry your grill completely after cleaning to help prevent rust, especially on cast iron grills and parts.
Additional grill parts to clean:
- Depending on your grill model, clean your heat shields or ceramic briquettes by using your brush to remove food or built up debris.
- Use a sponge to clean your drip tray or drip cup with warm, soapy water.
We suggest completing grill maintenance and a deep cleaning your grill like this a minimum of twice a year. When you fire your grill up for the first time of the season and before closing it up for winter.
We also recommend cleaning your grill after each use. It may seem like a lot of work, but a clean grill provides grill safety, clearing aware grease that causes flare-ups and uneven cooking. Any food you cook will be healthier for you by removing fats and old food. Plus, your grill work and look great for longer.
That’s it! Now you've got a clean grill, you can carry out an inspection to see if it’s time to repair or replace any parts on your grill.
Before Starting a Grill for the First Time — Is It Time to Replace Any Parts on Your Grill?
Running maintenance tests each year before grilling season is important to ensure optimal performance and safety. Over time, certain grill parts may wear out or become damaged so it's important to access if your grill needs any replacement parts to keep your grill in good working condition.
Regular grill maintenance and inspections will help you identify whether you need to fix or replace any parts on your grill before they become a bigger issue. In the end, you'll end up saving time, money and you're assured your grill will operate smoothly, safely and for a long time.
When should I replace my grill parts?
Grill burners, fuel hoses, and hardware are the most common parts you should run tests on and consider replacing when not working properly to get your grill ready for summer.
Grill Inspection
- Perform a leak test to make sure there is no gas leaking from your hose or propane tank. Turn on the gas. If you can smell gas or detect a leak, immediately turn off the gas. Do not try to light the grill until the leak is found and repaired. Do not attempt to repair the leak yourself, but call a professional repair person to inspect your grill.
- Rusting or other issues on your grill cooking grates may be able to be cleaned or repaired, but crumbling cooking grates or any crumbling components indicates it’s time to replace them.
- Inspect the grill manifold, the pipe behind the control panel where you attach the valves. This keeps the gas flowing smoothly and safely when it’s in use.
- Inspect your heat plates or briquette trays be sure they’re intact. If they crumble, you will need to replace them.
Whenever you can, think about replacing old or broken parts on your grill, instead of buying a new grill. Most parts of your grill have replacement options. These parts are cheaper and let you keep using the grill you love.
Need Replacement Grill Parts?
We sell BBQ grill replacement parts for most grill brands so search our store for grill parts filtering by brand or part type. Need help with a grill repair? Call our experts at 877-983-0451 and we’ll help you troubleshoot. If you live in South Florida, like Dade, Broward, or Palm Beach Counties, we can send one of our trained professionals to help you.
So far you've learned:
- How to get your grill clean cleaned.
- How to run grill maintenance tests and inspect your grill.
- When you need to replace your grill parts and where to find grill replacement parts.
Now, you’re ready to start your grill for the first time.
When you fire up the grill for the first time, you might have a large flame coming out of your burner. This test shows there’s a problem with the burner or another part that needs to be fixed or replaced before your grill is safe to use this summer.
**Grill Safety Tip: If your grill fails to light after a few tries, don’t continue trying to light it. Trying to light the grill repeatedly can cause gas to build up. This can lead to a risk of suffocation from lack of oxygen or cause an explosion when the grill finally lights. If this happens, turn the grill off and check out our troubleshooting guide.
You can find more grilling safety tips to help you avoid in accidents in our grill safety tips guide.
Once your grill is clean and full reassembled, reattach the gas line and light the grill. Run it on high for 15 minutes to help burn off degreaser or anything that wasn’t completely removed when you were cleaning.
The last step to getting your grill ready for grilling season: Seasoning the grill.
How to Season a Grill
Whether you are seasoning a new grill or an old one, the goal is the same. Seasoning helps protect your cooking grates from rust and wear but also adds a layer of cooked-on fats that gives your food rich flavor and makes the grill easier to clean.
Seasoning a new grill also removes the taste that nasty manufacturing chemicals can otherwise give your food. Grills used last season will taste of burnt old food or dusty and dirty from disuse if you don’t season it regularly. Instead, a seasoned grill will give your food that delicious, smoky, barbecue flavor you love.
*Important Note: If you’re seasoning your grill right after you clean and inspect it, you’ll be fine. If you plan to wait, make sure all parts of your grill are completely dry after cleaning, especially cast iron parts.
What Does it Mean to Season a Grill?
To season a grill, you coat the grill cooking grates and inner part of the grill with a high heat resistant oil. When you start your grill, the heat bakes oil into the surfaces which creates a non-stick barrier that helps stop corrosion and rust.
Seasoning your grill is an essential step to prepping your grill for summer, especially if you have cast iron grates.
What Kind of Oil Do You Season a Grill With?
You should use high heat resistant oils, also known as high smoke point oils, to season your grill. Here are some examples of oils you can use:
- Canola Oil
- Peanut Oil (although be careful if you’ll be grilling for anyone with peanut allergies)
- Avocado Oil
- Rice Bran Oil
How To Season A Grill
- Grab your grill grates and make sure they're completely dry. If you are seasoning a new grill, give them a quick rinse and dry completely.
- Grab the high heat resistant/smoke point oil of your choice and a cooking brush or even a plain old paper towel.
- Use a brush or towel to lightly oil the cooking grates, the inside of the grill, the lid, and the emitters (if your grill has them).
- Wipe off any excess oil. Too much oil will cause excess build-up and can cause a grease fire when you start your grill for the first time.
- Fire up the grill. Turn it up to blazing hot high heat and let it burn and smoke for 30-40 minutes.
- Allow the grill to cool and apply another coat of oil. Repeat this process a few times for best results.
Seasoning Cast Iron Grill Grates:
Once the grill is still cool, coat the cooking grate in oil and wrap it completely in aluminum foil. Place it in the grill, and do your final burn. Let it cool down again then pull them out of the grill, remove the foil, and you’re good to go.
With cast iron, the pores of the iron get imbibed with the oil, cooks in, then hardens during seasoning. Just like with a cast iron skillet, the seasoning process builds up a smooth non-stick coating that gets better every time you cook and season.
Seasoning Stainless Steel Grills or Grill Grates: If your stainless grill or cooking grates are new, they will change color and darken. This is totally normal and just an indicator that your nice non-stick seasoned surface has developed.
You're all set! Your freshly cleaned, repaired, and nicely seasoned grill is ready for summer and your best grilling season yet.
A Tip from Grill Enthusiasts to Get Extra Flavor in When Seasoning Your Grill
Getting your grill ready for summer is all about keeping your grill working at peak performance, but grilling season is all about the incredible flavors that grilling adds to any meal. So to pack even more flavor punch into your grill while your grill during the seasoning process, try rubbing on some foods with your favorite flavors or painting around with some strips of bacon to add extra flavor.
Need Help Getting Your Grill Ready for Summer?
After doing your inspection, have you noticed something isn’t working or is a part too old or corroded to repair? Get in touch with our grill experts and we’ll be happy to help you find all the parts you need to get your grill ready for summer—or even buy a top of the line new grill if the time has come. Give us a call at 1-877-983-0451.
FAQ
- How long do grills last? The short answer to how long your grill will last is somewhere between 2 to 25 years or more. There are alot of reasons why one grill may only last 2 years and another over 25 years. How long your grill lasts depends on a lot of factors coming from a lot of different sources-- from where your grill was manufactured, what kind of grill you have, how often you use it, and how well you take care of it. To get more information on this topic, check out our guide to help further answer this question, plus tips on how to extend the life of your grill.
- Can you hose down a grill? Yes. If your parts are inside of the grill, make sure you don't get the inside of the grill wet. If you spray underneath the hood or inside the firebox, make sure all your parts are removed before hosing down your grill.
- How to install a replacement part in a gas grill? First, check your grill manual for step by step instructions on removing and replacing a grill part. If you're still confused or unsure, we're here to help! At the BBQ Depot, we're here to help you every step of the way from purchase, to installing new parts in your grill. If you live in South Florida, like Dade, Broward, or Palm Beach Counties, and in need of a grill repair or looking for hands on assistance, give us a call and we'll be happy to send one of our experts to you. If you're not local, don't worry! We have both step-by step videos on our Youtube channel and guides on our website on how to install a variety of grill parts in most grill brands. To view our step by step guides, head to our learning center, search the word "install" in the search bar and get all the information you need right at your fingertips.
