
How to (Properly!) Clean a Gas Grill
The Quick and Easy Version
A Clean Gas Grill Is a Well-Functioning Gas Grill
If you want to grill like a master, you need to know how to clean a gas grill.Keeping your grill clean is essential to ensuring it cooks as well as it should, without avoidable breakdowns and deterioration.
How to Clean Grill Grates
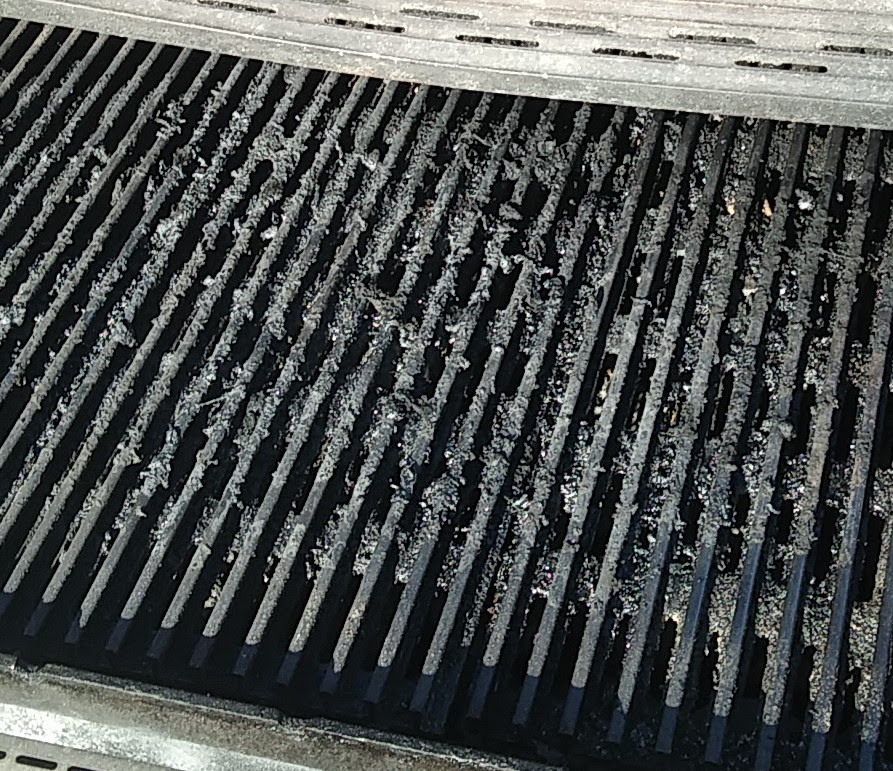
Even master grillers can serve up subpar dishes if they don’t know how to clean a grill. The first step is cleaning your grill grates. Food and grease can easily build up in the grid, leading to corrosion if left unchecked for extended periods of time. Regular cleaning preserves the grate components and results in better-tasting food—a win-win.
Before Cooking
Take a look around your barbecue to get a sense of its current state.Make a full inspection of your grill to make sure there are no obstructions, such as food sticking to your burners or grates.
Burn Away Food Scraps
Heat the grill on high for 5–10 minutes, then allow it to cool.
Shut Off the Gas
For safety, turn off the gas and detach the gas line.
Brush Away Any Debris on the Grate
Once the grill is cool, use your grill brush to carefully remove any remaining debris.
Deeper Grill Grate Cleaning
Once visible debris has been removed, make a second pass on your grates. This time, check your grates for any cracks in the coating or enamel, anduse adegreaser or an apple cider vinegar mixture to clean the grates of lingering residue and carbon buildup.
Washing the Grate
Finally, use a sponge and soapy water to restore your grates to pristine condition. If debris is really caked on,soak the grates in soapy water for 15 minutes.
Cleaning Your Heat Shields or Ceramic Briquettes
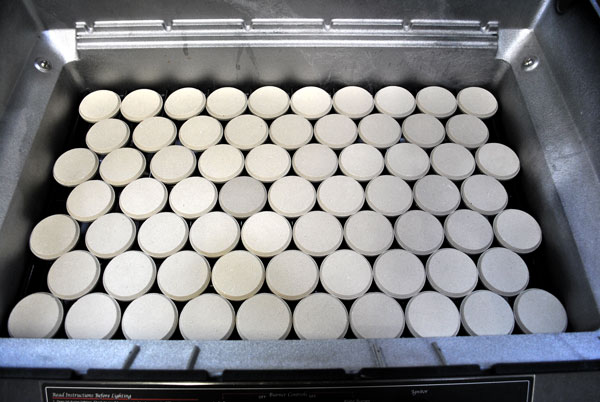
If your grill has heat shields or ceramic briquettes, you’ll want toclean those regularly as well. When the grill is cool, remove your briquettes and clean them with a wire brush. Some grills have special instructions for their briquettes, so checkyour manual beforehand.
Spray heat shields with a degreaser and then clean with a wire brush or Brillo pad before wiping them down. Inspect heat shields as you clean, as these are often the first component of a grill to wear out.
How to Clean a Grill: Grill Burners
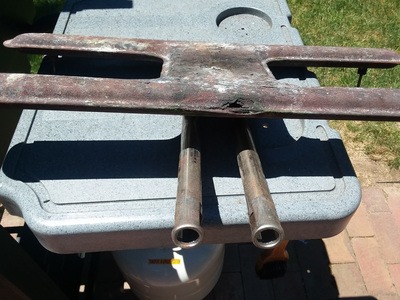
Burners can vary widely depending on the grill, so you’ll want to double-check your manual for removal and cleaning instructions. You can also call the team at the BBQ Depot for advice on your grill’s burners. If you remove the burner, use a wire brush to remove grease and debris and clean blockages in your tubes with a small drill bit or paperclip. DO NOT use water on the inside of your burners.
Fireboxes can get very dirty. Spray the inside with a degreaser, let it sit for a minute, and then scrub it clean. You can repeat this process a few times to get the firebox as clean as possible.
How to Clean A Grill: The Drip Tray
Remove the drip tray, dump out any debris, and then wash it in soapy water. Dry the tray before you return it to its spot in the grill.
Finishing Touches
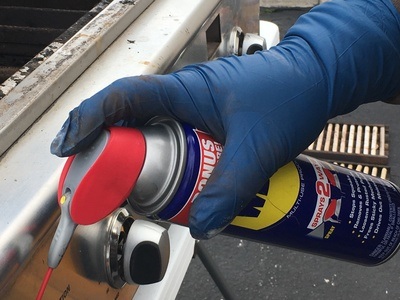
When everything else is finished, clean your control knobs, grease the gas valve stem, and wipe off the outside of your grill.
Putting the Grill Back Together
Once you’re done cleaning,make one final inspection to ensure allparts of the grill are clean, dry, and correctly assembled. Make surewire bristles aren’t stuck anywhere. With everything reassembled,reattach the gas line and run the grill on high for 15 minutes to burn off any extraneous debris and leftover degreaser. Some cast iron grates should be seasoned at this point.
A Few Tips on Maintaining Your Gas Grill
Regular maintenance is essential to keeping your grill in excellent working condition. While a full disassembly may not be needed every time, light cleaning, debris removal, wiping the grill down, and checking for propane leaks only take a few minutes and can prolong the life of your grill for years.
Need Help? Talk to Our Experts!
At the BBQ Depot, we pride ourselves on our expertise in everything grilling. We can assist you in picking out a grill, help troubleshoot problems, and walk you through the cleaning process for your specific make and model. Get in touch at your convenience!
How to (Properly!) Clean a Gas Grill
A Clean Gas Grill Is a Well-Functioning Gas Grill
Grills take a lot of wear and tear over time. Extreme temperatures, buildups of grease, carbon and food debris, rust and environmental factors can all wreak havoc on your grill over time.
Frequently cleaning your grill will improve the safety of your grill, taste of your food, cut down on extra smoke, and ensure your burners are burning clean and heat is being distributed evenly. It will also give you a chance to inspect your grill from top to bottom, and make sure it’s in good shape.
An important part to inspect is the grill manifold. The manifold is the pipe that holds the valves. On some grills you may need to remove the control panel to see the manifold. Spray some soapy water around the valves and along the manifold. If you see bubbles you may have a leak. If the steal pipe feels soft or has any holes, you do NOT want to proceed further. This must be replaced. Contact the manufacturer for availability.
Here’s how to clean a gas grill in a few easy steps.
How to Clean Grill Grates
You don’t have to clean every part of your grill every time, but you should always clean the grate. Food, grease and water can build up on it quickly, causing corrosion in some cases. Steel grates can be particularly vulnerable to damage as their coating wears off, but even ceramic-coated high-quality cast iron grill grates can be damaged by improper handling, causing the coating to chip, and making the whole grate susceptible to rust. Frequent cleaning will help ensure that it has a long life, and keep your food tasting great, every time.
Before you clean your grill, it’s a good idea to check the manufacturer’s recommendation for which brush to use. Stainless steel and uncoated cast iron grates generally won’t be damaged by a wire brush, but any grill grate that is porcelain coated may be vulnerable. If you’re unsure whether your grill might be damaged, use a nylon grill brush rather than a steel one. It may take a bit more elbow grease, but you’ll still be able to get your grill sparkling clean.
Not quite sure how to clean your grill grates? Here’s the basic process to get you started:
Before Cooking
If you haven’t used your grill in a few weeks, it’s a good idea to check the grate before cooking. Nothing will ruin a great day of grilling like a little rust in your meat! If it’s been more than a month, it’s a good idea to do a thorough inspection, or get an authorized professional grill inspection to make sure it’s in good working order.
Burn Away Food Scraps
The first step in cleaning your grill grates is to burn off any food scraps left from cooking by heating it on high for 5–10 minutes. Once you’ve done this, turn off the grill and allow it to cool. Iron grill grates and other heavy-duty grates can hold onto heat for a while, so make sure your grill is completely cool before proceeding.
Shut Off the Gas
Turn the gas supply valve clockwise to shut off the gas. The valve will either be on a gas line (natural gas) or on top of the tank (LP gas). Now, detach the gas line.
Brush Away any Debris on the Grate
Next, brush your grill off with your grill brush. Brush both sides, and between the bars, paying extra attention to the places where the bars of the grate intersect with each other or the rim. Food scraps can start to build up in these corners.
Deeper Grill Grate Cleaning
Take a close look at your grill grate, checking for both dirt and damage. If you don’t clean your grill regularly, it may have black carbon deposits caked on, which can trap bacteria, cause uneven heating and increase the risk of grease fires. Take notice if the enamel is cracked anywhere or (with coated steel grates) if the nonstick coating has come off. Even small cracks in the enamel can let water and grease in, making it vulnerable to rusting. If your grill grate has cracked enamel or significant rust, you may want to replace it.
Now, spray your apple cider vinegar mixture or degreaser on the grate, and wipe clean. Repeat as needed, until the paper towel comes back without any residue.
Washing the Grate
Generally, it’s best to just use a sponge and soapy water to wipe off your grate. This will get rid of any remaining grease. However, if your grate has caked on carbon, you can soak it in a bucket of soapy water for 15 minutes, then sponge it off. Set it aside on a soft surface, out of the way.
Cleaning Your Heat Shields or Ceramic Briquettes
Depending on the model, your grill may use heat shields or ceramic briquettes. A heat shield or heat deflector is a piece of metal that sits over the burner to distribute heat. Ceramic briquettes look like little tiles, or stylized pieces of charcoal, all the same size and shape.
It’s also possible that your grill has lava rocks — little clumps of volcanic rock that look like charcoal. Lava rocks are hard to clean. Their porous surface absorbs grease, and they’ll fall apart if you try to scrub them. If you have lava rocks, we recommend replacing them with ceramic briquettes.
Ceramic briquettes are easy to clean with a wire brush. Remove them, and scrub until any debris falls off. If you have a heat shield, spray it with a degreaser, then clean it with a wire brush or brillo pad and wipe it clean with a cloth. Do not use water or degreaser on briquettes as they will crumble.
Both heat shields and ceramic briquettes will wear out eventually, so you should inspect them carefully as you clean. If your briquettes are starting to crumble when you clean them, it’s probably time to replace them. However, cracks or nicks on a few briquettes shouldn’t be a problem. As long as they’re mostly intact, they should work fine.
Heat shields, on the other hand, are often the first thing to wear out on a grill. If your heat shields are rusty or warped, they can’t disperse heat evenly, and may not protect the burner from dripping heat. That means it’s probably time to replace them.
Tip: Some grills like the Alfresco ALXE have special instructions for cleaning ceramic briquettes. The ALXE service manual instructs you to flip the briquette assembly upside-down and put the grill on high for 30 minutes to clean the briquettes. Then, wait for them to cool and put the assembly in the right way. In the ALXE, you can also scrub briquettes occasionally, but you don’t have to every time you grill.
How to Clean Grill Burners
Now, remove the burner tubes and clean them thoroughly. They may be attached with a screw or cotter pin, depending on your grill. Removing burners can be quite complex with some grills. Old Weber Genesis grills had a complex system, where the electrodes were mounted to the first burner, and a crossover tube carried the flame to the other two. Over time, corrosion would tend to freeze the screws attaching the crossover tube, preventing you from detaching it, which required an elaborate workaround to change the burner (see the link above if that describes your burner).
The point of this digression is that burners are complicated, and vary a lot from model to model, and brand to brand. If you can’t look at the burner and figure out how it works before disassembling it — or if parts are frozen in place — feel free to call us. We’d be happy to talk you through it.
Remove the igniter and wrap the wire ends carefully in foil to keep them free of debris. Be sure to note exactly how the igniter fits into the burner — failing to reinstall your igniter assembly correctly is one of the surest ways to have your grill refuse to light.
To clean burner tubes, use a stiff wire brush and a venturi brush to clear out any spider webs. Brush gently across the ports to remove any grease and debris (brushing along the ports can push dirt into them. If your tubes are very dirty, you can also try using a small drill bit, paperclip or other small metal object to remove any blockages. Inspect your burners for any rust. If your burners are rusty, damaged or have gaping holes, they should be replaced.
To insure you get the correct burner from your grill, measure the burner from end to end and compare the dimensions to what we list on our site.
You’ll see many gas grill cleaning guides recommend using a hose to clean the inside of burners. DO NOT DO THAT! Water can cause rust and prevent your burners from working properly. Instead, shake them out to dislodge any debris inside. If you have a shop vac, you can also use it to suck any detritus out of the inside of the tubes. Check out our complete Guide to How to Clean a Grill Burner for more information.
Tip: Some grills have unusual burners that have different cleaning needs. For example, high-end Lynx Professional Grills have ceramic burners, which are marketed as self-cleaning. We still think it’s a good idea to wipe these clean, but you should not degrease and scrub them like regular metal burners. Simply brush the burners clean with a cloth, inspect them to make sure they’re clean, unclogged and uncracked, and carefully set them aside.
How to Clean out the Firebox
The firebox can get very grimy, and may have debris built up in it if you haven’t cleaned your grill for a while. If you have a shop vac, you may want to vacuum out any debris as a first step. Otherwise, scoop or brush it out of the box. If you don’t have a shop vac, a hand broom and dustpan can make this part easier.
Now, spray the firebox and the inside of the cover with degreaser, and wait a few minutes for it to set in. Then, scrub away! You may have to go over the firebox a few times to get everything clean. If you do, wipe it with a paper towel between rounds of cleaning to remove the dirty degreaser fluid. Then, spray it and allow the degreaser to soak in again as needed. When you’re done, wipe the inside of the grill out entirely with a paper towel.
Tip: The bottom of the firebox may be covered with carbon deposits. If you have trouble getting it off with the grill brush, try using a putty knife to scrape off the big chunks.
How to Clean the Drip Tray
There’s no getting around it — by this point, your drip tray is going to be getting pretty gross. Carefully remove it and dump debris into the trash. Then, wash it with soap and water, dry it and return it to the grill.
Finishing Touches
Remove the Grill Control Knobs. It is a good idea to spray some WD-40 around the gas valve stem to keep it lubricated.
Wipe the outside of the grill with a microfiber cloth. Be sure to clean the knobs as well, taking care to remove any gunk that’s accumulated in them. Make sure all your parts are dry. Now, it’s time to put everything back together.
Putting the Grill Back Together
Take the time to inspect each part once again, and make sure all your parts are intact, dry, free of any residue and placed in the proper position. Keep an eye out for wire bristles. They can come out while you’re scrubbing your grill, and get caught in burners, grates and other places.
When you’ve fully assembled it, reattach the gas line and light the grill. Running it on high for 15 minutes will help burn off degreaser or any debris knocked loose but not completely removed during the cleaning process.
If you have a cast iron grill, it's a good idea to season your grate during this final burn. Before you turn on the heat, cover your grate with cooking oil, wrap it in aluminum foil, and place it inside the grill. When you’re done, simply wait for it to cool, unwrap it and place it back in. Seasoning will help protect your grate from rust and premature wear.
Tip: If your grill doesn’t switch on after a few tries, do not continue trying to light it. Gas can build up, causing a risk of asphyxiation, or an explosion when it finally does light. Turn it off, take a break and then check out our troubleshooting guide.
A Few Tips on Maintaining Your Grill
Maintaining your grill can seem like a lot of work. But if you put in a bit of time for regular cleaning and maintenance, you won’t have to worry about more significant (and costly) problems later on.
Here are a few tips on maintaining your grill and keeping it in tip-shop shape for years to come:
- Lightly clean your grill every time you cook.Built-up carbon and grease can trap bacteria and corrode your grates—and they only get tougher to remove as time goes on.
- Keep your grill on high for 15 minutes aftercooking to burn off any debris and leftover food scraps.
- Check for propane leaks on a regular basis.
Need Help? Talk to Our Experts!
Is something not working? Are one of your parts a little too far gone for cleaning to save? We’d love to talk to you to get you the parts you need to fix or refresh your grill—or to help you find a brand-new grill. You can contact us at 1-877-983-0451. We look forward to hearing from you!
Cleaning a Gas Grill FAQs
Do I need professional tools?
No! You only need a few simple items, including a grill brush, a scraper, washcloths, soapy water, and a degreaser.
How often should I clean my gas grill?
If you grill frequently, once every month or every few months should be enough to keep your grill in good condition. If you only grill once a month or less, cleaning 1–2 times a year should suffice.
Can I hose down my gas grill?
Yes, it’s okay to hose off a gas grill to clean off food particles and debris, though a brush may still be needed for caked-on debris. Be sure to have these parts removed from the grill. Ensure the burners are off and the grill is cool before removing any parts.
Do I need to clean the bottom of my gas grill?
Yes, you should wipe off debris and clean the bottom of your grill as well.
Is it okay to cook on a dirty grill?
It’s certainly possible, though not ideal. It’s better to clean your grill beforehand to avoid ingesting burnt food particles and other debris while grilling.
Do you clean a grill when it’s hot or cold?
For cleaning, the best way is to heat up your grill and then wait for the components to be warm, but not too hot to handle.
Should I oil my grill grates after cleaning?
Cast iron grill grates should be lightly oiled after cleaning.
How do I keep mice out of my gas grill?
Keep mice out of your grill by keeping it clean, using a grill cover, and filling in any holes or gaps.
Is a little rust on grill grates okay?
It likely won’t hurt to use it a few times, but the safest practice is to take care of the rust on your grates before using the grill further.
